Sunday, 15 March 2015

WEEK 4: 3D PRODUCTION PIPELINE

3D Production Pipeline
MDU115 Research an Development Blog
Pioneers

Ed Catmull
One of the greatest contributors to the computer graphics industry. He was a co-founder of Pixar Animation Studio and currently the president of Pixar and Walt Disney Animation Studios. He is responsible for the invention of texture mapping, anti-aliasing, subdivision surfaces and z-buffering.

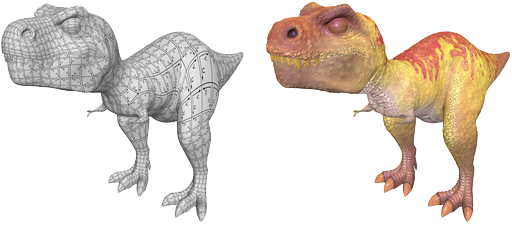
http://ptex.us/ptexpaper.html

Ken Perlin
Another big contributor to 3D graphics. Ken Perlin is responsible for Perlin Noise, Hypertexture, Real-Time Character Animation and Stylus based input devices. All these things are used every day in a 3D production. 


Krishnamurthy and Levoy
These two are the inventors of normal mapping. Without normal mapping video games wouldn't be able to look as detailed as they do these days. Normal mapping allows low polygon models to look like high detailed models.


http://forum.toribash.com/showthread.php?t=497808


Inspirations

Tal Peleg http://www.tp-artwork.com/
Tal Peleg has worked on many projects as an animator. The Last of Us, Uncharted 4 and A Christmas Carol to name a few. But one project that stands out is the Dante's Inferno fan fiction short Dante's Redemption. Tal's credits on this project are Director, Scene Layout, Keyframe Animator, Lighting, Compositing, Editing and Matte Painting.


Written by Blake Head

WEEK 3: 3D PRODUCTION PIPELINE

3D Production Pipeline
MDU115 Research and Development Blog

There are many different aspects and stages in a 3D production pipeline. All are important steps in creating an appealing, believable, 3D product. In this blog I will go through the different steps in this process and what they involve. 

Lighting
In 3D lighting objects are used to simulate how light works in real life. lighting can be used to get the exact feel you want for your shot to help it come alive. You can apply different settings to the lights and materials to achieve what you are after.


http://www.prweb.com/releases/2011/8/prweb8688878.htm


Rendering
Once all elements in your scene have been created and setup the next step is to render it out. Rendering is the process of outputting a shot or image to a final polish. Depending on the complexity of what you want to render it can take minutes or hours to complete.


http://www.fanpop.com/clubs/fable/images/829863/title/fable-2-3d-render-hobbe-screencap


Compositing
Compositing is process of putting it all together. Different elements such as a final render, live action film and special effect like smoke, fire, explosions etc are layered together to complete the final product.


http://andyswi.com/

Written by Blake Head

Friday, 13 March 2015

WEEK 2: 3D PRODUCTION PIPELINE


3D PRODUCTION PIPELINE

MDU115 Research and Development Blog

There are many different aspects and stages in a 3D production pipeline. All are important steps in creating an appealing, believable, 3D product. In this blog I will go through the different steps in this process and what they involve. 


UV Mapping, Textures and Shaders
The next step in a typical 3D production pipeline is 'colouring' your model. This is done using UV mapping, texturing and shaders. By unwrapping your model and turning it into a flat 2D image, colouring that image and attaching the painted image onto a shader you can add colour and much more to your 3D model.

UV mapping is the process of flattening out a 3D model to represent it in a 2D image. This process can be done automatically or manually. Most of the time it is done manually. Which can be a tedious task but needs to be done correctly as the UV map needs to fit into a particular size and format to properly be applied. Once you have your UV map you can export it out to a painting program and start making your texture.


http://goanna.cs.rmit.edu.au/~gl/teaching/Interactive3D/2012/lecture9.html
Once you have exported the UV map to your painting program of choice you can start texturing. Textures are basically the skin of your model. You can paint it from scratch or use photos to create the texture. After the texture has been created you can attach it to a shader.

A shader is how you apply your texture to your model. You attach a shader onto your model and the attach the texture onto the shader. The shader calculates how to show and process the image.
http://arstechnica.com/information-technology/2010/07/ptex-3d-texturing-becomes-a-reality-at-siggraph/
Rigging and Animation

Once the textures have being completed you can start to rig your model for animation. In bigger productions texturing and rigging are usually done by separate people. If that is the case the rigging can be setup well the textures are still being completed. Rigging involves binding bones and joints to a 3D mesh and attaching handles so they can be easily manipulated to move your model in a desired way. 


http://en.9jcg.com/comm_pages/blog_content-art-16.htm


Next up in the process is animation. As stated before handles are attached to the rigging so you can move the model. By using keyframes to capture certain poses the software will automatically fill in the rest. For example if I were to animate an arm swinging from left to right I would position the arm on one side. I would then attach it to a keyframe. Next I would more up the time line a few frames and adjust the arm to the other side and attach that to a key frame. The program will then make the calculations necessary to fill in the actions inbetween. 

http://austinvisuals.com/how-2d-and-3d-animation-is-made-at-austin-visuals-animation-studio/

Written by Blake Head

Thursday, 26 February 2015

WEEK 1: 3D PRODUCTION PIPELINE


There are many different aspects and stages in a 3D production pipeline. All are important steps in creating an appealing, believable, 3D product. In this blog I will go through the different steps in this process and what they involve. Starting with Pre-production and 3D Modeling.
3D PRODUCTION PIPELINE
MDU115 Research and Development Blog


Pre Production
Pre-production is essentially the planning stage. Where ideas are worked over and over to create the blueprints of the production. Now depending on the needs of your project this may cover script writing, story boarding, character and environment concept designs. By focusing on these areas first you allow yourself to make all the final design and story decisions before you begin actually making the project. Allowing you to plan ahead and budget as accurately as possible.


Concept art is used to lock down the final designs for the characters, environments and props. Designs go through many iterations to find the perfect look. Giving the people working on the project a style and feel to go for.

Script writing and story boarding are used to solidify the story and how it will be shown. Writing a script allows you to plot out what happens in your story in detail. Story boarding is used to show what happens in the script visually. A shot by shot breakdown of what you are about to create.


3D Modeling
After pre-production is complete the next step in the process is 3D modeling. As soon as an assets design has been finalized you can start modeling it. Modelers will look at the model sheets and designs and use programs like Maya, 3Ds Max and many more to model the concepts into three dimensional objects.


These programs use points in a 3D space to represent an object. These points are called Vertices. Lines are used to connect the vertices to create a mesh which covers the object. This is called polygonal modelling. Another form of modeling called sculpting. You can use programs such as Zbrush and Mudbox to essentially sculpt a mesh into whatever you like.


By Blake Head.


Images sourced from Here and Here.

Wednesday, 25 February 2015

DEVELOPMENT BLOG 1

Development Blog: Treasure Chest
MDU115 Research and Development Blog


This week I was tasked with modelling a treasure chest for my second assessment in my MDU115 Foundations of 3D Graphics. First step: research and concept. So I googled many images of different types of treasure chests. Got some ideas and started sketching. As the chest I am developing is to be used with other assets I needed to keep the style within context to these assets.


Next I need to start modelling the chest. So I did.


By Blake Head.